
Flowers Blooming at the End of Summer Custom Guide
Original Korean Guide(원본 한국어 가이드) >
简体中文指南 >
1. About Language Patches
Flowers Blooming at the End of Summer officially supports language patches. This means that users can freely modify and add their desired languages, and switch between them at will within the game.
The game also supports several features to assist with language patching. The following is a helpful guide for creating an unofficial language patch for Flowers Blooming at the End of Summer.
1-1. Creating the Language
You can generate a basic language template for Flowers Blooming at the End of Summer using Ren'Py's "Generate Translations" function. When generating the language, please remember the "language codename." The language codename is typically a lowercase English string without spaces. For example, for English, it could be "english", and for Simplified Chinese (简体中文), it could be "schinese".
For reference, the language codename for the default language, Korean, is None (without quotation marks).
1-2. Registering the Language
To apply a language to the system of Flowers Blooming at the End of Summer, you must register it. If you register a language in a language template that hasn't been registered yet, or if you insert a registered language patch into the game, Flowers Blooming at the End of Summer will set its language according to the user's system language settings.
Additionally, it allows users to freely control the language through the built-in language selector.
To do this, create a .rpy file and place it in the path tl/(language codename folder)/lang_setting.rpy. The top of this .rpy file must contain the following source code:
init -1:
    register_language(name="The name of the language in its native form", id="language codename", subtitle_text="①The English name of the language", uifont_path="Path to the default font for the UI",
                      dialoguefont_path="Path to the default font for the dialogue box", breaking_method="②Line-breaking preset", locale="③The language part of the system locale", script="④The script part of the system locale",
                      region=("⑤Region part of the system locale 1", "Region part of the system locale 2..."), version="⑥Version")
①The English name of the language: If a separate English name is not needed, such as for "English", please enter None, which means it is empty.
②Line-breaking preset: You can check the available options at this link. Generally, "unicode" is suitable for most languages.
You can find the system locale for each language at this link. The explanation below assumes the system locale is "ko-kr".
③The language part of the system locale: Here, you would use the language part, which is "ko".
④The script part of the system locale: For most languages, you can just write None, meaning it is empty. This is only used on macOS. This part is not used and does not exist in a Windows environment. However, on macOS, while it's non-existent for most languages, there are some languages where it exists, such as "zh-hans-cn" (whereas on Windows, it would simply be "zh-cn"). In this case, the "hans" part is the script. Please enter this part. As mentioned, if the system locale is "ko-kr", you should write None (without quotation marks) for the script part, which means it is empty. You can check all languages that use a script by referring to Table B-4 at this link.
⑤The region part of the system locale: Here, you would use the latter part, which is "kr".
Thus, for a system locale of "ko-kr", the last three parts would be "ko", None, "kr". However, since Korean does not need to recognize "kr", it is recommended to use None instead of "kr". This allows you to enter "ko", None, None.
If there are two or more region parts to recognize, you can add multiple regions like this: ("like", "this", "example").
All code related to the system locale should be written in lowercase.
Fonts can be placed in the game/tl/(language codename)/fonts path, or you can use the existing font paths from Flowers Blooming at the End of Summer.
Here are some examples:
Korean:
init -1:
    $ register_language(name="한국어", id=None, subtitle_text="Korean", uifont_path="fonts/NanumSquareB.ttf",
                      dialoguefont_path="fonts/NanumSquareRoundB.ttf", breaking_method="korean-with-spaces", locale="ko", script=None,
                      region=None, version="1.0")
English:
init -1:
    $ register_language(name="English", id="english", subtitle_text=None, uifont_path="fonts/NanumSquareB.ttf",
                      dialoguefont_path="fonts/NanumSquareRoundB.ttf", breaking_method="unicode", locale="en", script=None,
                      region=None, version="1.1")
Simplified Chinese:
init -1:
    $ register_language(name="简体中文", id="schinese", subtitle_text="Simplified Chinese", uifont_path="tl/schinese/fonts/DreamHanSans.ttf",
                      dialoguefont_path="tl/schinese/fonts/975maru.ttf", breaking_method="korean-with-spaces", locale="zh", script="hans",
                      region=("cn", "sg"), version="1.0")
The final part, ⑥Version, is an identifier that you can change to track updates to the language patch (e.g., when there are changes to the strings).
1-3. Setting Up Fonts
Next, you need to set the fonts for the UI.
The fonts for the UI elements of Flowers Blooming at the End of Summer can be adjusted via lang_style.rpy.
You can download it from the link below.
Download lang_style.rpy template (3.0+)
Modify the lang_style.rpy file as needed and place it in the path tl/(language codename folder)/lang_style.rpy.
In the template, every instance of (language name) in the translate (language name) part must be replaced with the language codename you are applying.
For example, if the language codename is "english", then translate (language name) style default: should become translate english style default:.
1-4. Applying UI Images
Most of the UI in Flowers Blooming at the End of Summer is composed of images.
You can download the UI PSD templates from the link below.
Download Flowers Blooming at the End of Summer UI Templates (3.0+)
By default, Flowers Blooming at the End of Summer uses a semi-transparent image when the mouse hovers over a button. The hover image has an opacity of 50% of the base image (unless an opacity value is explicitly specified in the layer name).
1-5. Applying Video Subtitles
To support the 'Last Wish' fireworks cutscene and multi-language subtitles in Flowers Blooming at the End of Summer, you need to apply video subtitles tailored to your language.
This can also be easily done by modifying a template. You can find the application method and download the custom template in 1-9. 'Last Wish' Cutscene and Custom Video Subtitle System below.
1-6. Strings Not Translated Directly from the English Original
For some English phrases in the translation file common.rpy, do not treat the original "old" string as your source. Instead, treat the "New base string" provided below as the new "old" string, and write your "new" translation based on it.
1.
old "Saved screenshot as %s."
(Original)
new "%s"
(New base string)
2.
old "This save was created on a different device. Maliciously constructed save files can harm your computer. Do you trust this save's creator and everyone who could have changed the file?"
(Original)
new "This save was created on a different device.{vspace=1}{size=23}Save files from untrusted sources may harm your device.\nYou may see this message if the save file from Steam Cloud was created on a different device.\nDo you trust this save and want to continue?{/size}"
(New base string)
The actual Korean text used in Flowers Blooming at the End of Summer is as follows:
new "다른 PC에서 생성된 저장 파일입니다.{vspace=1}{size=23}신뢰할 수 없는 출처의 저장 파일은 PC에 해를 끼칠 수 있습니다.\nSteam Cloud의 저장 파일이 다른 PC에서 생성되었을 경우 이 메시지가 보일 수 있습니다.\n이 저장 파일을 신뢰하며, 계속 진행할까요?{/size}"
3.
old "Do you trust the device the save was created on? You should only choose yes if you are the device's sole user."
(Original)
new "Do you trust all the saves made on this device?{vspace=1}{/size}{size=23}Only click the confirm button to continue if the save file was created by another device, \nnot downloaded from an unknown web source or elsewhere. \nOnce you click the confirm button, any save file created on this device will be loaded without asking.{/size}"
(New base string)
The actual Korean text used in Flowers Blooming at the End of Summer is as follows:
new "이 PC의 모든 저장 파일을 신뢰할까요?{vspace=1}{size=23}출처를 모르는 웹 등에서 다운로드한 것이 아닌,\n다른 PC에서 직접 생성한 저장 파일인 경우에만 확인 버튼을 눌러 계속하세요.\n확인 버튼을 누르면, 앞으로 이 PC에서 생성된 저장 파일은 질문 없이 불러옵니다.{/size}"
1-7. Strings Where the Korean Translation is Considered the Source
For some strings in screens.rpy, the original text is set to English instead of Korean to prevent character-breaking issues in other languages with updates to Flowers Blooming at the End of Summer. When the game's language is set to Korean, it converts and displays these strings in Korean.
Therefore, the original English string may not capture the full meaning of the Korean string, and you should treat the Korean "new" string as the authoritative "old" string for your translation.
Below are all the affected strings.
old "Lyric Subtitles"
new "가사 자막"
old "Dialogue Subtitles"
new "대사 자막"
old "Language Switch Shortcuts"
new "언어 전환 단축키"
old "Multi-language Subtitles"
new "다중 언어 자막"
old "Labs"
new "실험실"
old "Flowers Blooming: Main Game"
new "‘여름의 끝에 피는 꽃’ 본편"
old "You are currently running the Main Game of Flowers Blooming \nat the End of Summer. Thank you sincerely for your purchase and support."
new "현재 ‘여름의 끝에 피는 꽃’ 본편을 실행 중이에요.\n‘여름꽃’을 구매하고 후원해주셔서, 진심으로 감사드립니다."
old "Flowers Blooming: Steam Edition"
new "‘여름의 끝에 피는 꽃’ 스팀 에디션"
old "You are currently running the Steam Edition of Flowers Blooming \nat the End of Summer. Thank you sincerely for your purchase and support."
new "현재 ‘여름의 끝에 피는 꽃’ 스팀 에디션을 실행 중이에요.\n‘여름꽃’을 구매하고 후원해주셔서, 진심으로 감사드립니다."
old "This Supporter’s Edition includes achievements, cloud saves, and \nSteam Points Shop rewards like Trading Cards, Avatars, and Profile Backgrounds."
new "도전 과제와 스팀 클라우드 등 편의 기능이 포함된 후원판입니다.\n트레이딩 카드, 아바타, 프로필 배경 등 포인트 상점 아이템을 포함합니다."
old "Flowers Blooming: Design Works"
new "‘여름의 끝에 피는 꽃’ 디자인 웍스"
old "The official digital artbook, featuring behind-the-scenes \nstories, setting details, concept art, and storyboards from development."
new "‘여름의 끝에 피는 꽃’의 공식 디지털 아트북입니다.\n개발 비화, 설정, 컨셉 아트, 스토리보드 등을 포함합니다."
old "Flowers Blooming: Soundtrack"
new "‘여름의 끝에 피는 꽃’ 사운드트랙"
old "The official OST with 16 tracks, \nincluding two previously unreleased bonus songs."
new "‘여름의 끝에 피는 꽃’의 공식 사운드트랙입니다.\n본편에 미공개된 두 곡을 포함, 총 16곡입니다."
old "Flowers Blooming: Wallpaper"
new "‘여름의 끝에 피는 꽃’ 디지털 월페이퍼"
old "Official wallpapers showcasing event CGs, \nincluding some that do not appear in the main game."
new "‘여름의 끝에 피는 꽃’의 공식 디지털 월페이퍼입니다.\n본편에 미공개된 이벤트 CG를 포함합니다."
old "Open"
new "열기"
old "Purchase"
new "구매"
old "Owned"
new "보유 중"
old "Play"
new "실행"
old "Open Design Works Now"
new "디자인 웍스 바로 열기"
old "View in Folder"
new "폴더에서 보기"
old "DLC installed but path not found.\nConfirm files haven’t been deleted, moved, or renamed."
new "DLC가 설치되었으나, 설치된 경로를 찾지 못했습니다.\n파일을 삭제 혹은 이동, 혹은 파일의 이름을 바꾸지 않았나 확인해 주세요."
old "DLC installed but path not found.\nConfirm files haven’t been deleted, moved, or renamed.\nThis may occur if your Free Edition and DLC paths differ.\nWould you like to launch the Steam Edition instead?"
new "DLC가 설치되었으나, 설치된 경로를 찾지 못했습니다.\n파일을 삭제 혹은 이동, 혹은 파일의 이름을 바꾸지 않았나 확인해 주세요.\n이는 현재 실행 중인 Free 버전과 설치된 경로가 달라서 그럴 수 있어요.\n대신 Steam 에디션을 실행할까요?"
old "Can access DLC folder but files are missing.\nConfirm files haven’t been deleted, moved, or renamed.\nOpen installation folder instead?"
new "DLC가 설치된 폴더는 열 수 있으나, 파일을 찾지 못했습니다.\n파일을 삭제 혹은 이동, 혹은 파일의 이름을 바꾸지 않았나 확인해 주세요.\n대신 설치된 폴더를 열까요?"
old "Game and soundtrack may have different installation paths.\nPlease check each path separately in Steam."
new "게임이 설치된 경로와 사운드트랙이 설치된 경로가 다를 수 있습니다.\n이 때는 Steam에서 각각의 설치 경로를 확인해 주세요."
old "Original expected path"
new "원래 존재해야 하는 경로"
old "This save file was created with a mod that is not currently installed.\nTo load this save file, you need to install the mod first."
new "{size=35}현재 설치되지 않은 모드에서 저장된 파일입니다.\n이 저장 파일을 불러오려면, 먼저 해당 모드를 설치해야 합니다.{/size}"
old "This save file has the following mod applied:"
new "이 저장 파일에 적용된 모드:"
old "The currently applied MOD file does not have a translation for this language ([lang_current]).\nText may appear broken.\nPlease download the latest version of the MOD or a MOD file translated to this language."
new "현재 적용된 MOD 파일에는, 해당 언어([lang_current])의 번역이 존재하지 않습니다.\n텍스트가 깨져 보일 수 있습니다.\nMOD의 최신 버전이나, 해당 언어로 번역된 MOD 파일을 다운로드해 주세요"
1-8. Additional Helpful Information
1-8-1. Tooltips
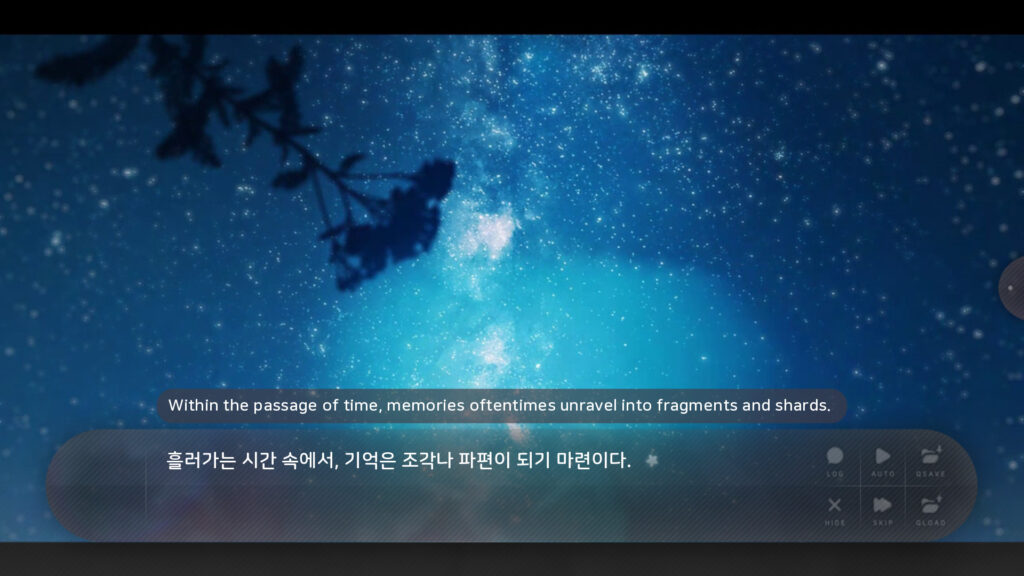
You can add tooltips that explain certain words. This can be done within the translation .rpy files.
For example, to insert a tooltip for the word "comment" in the translation below, follow these steps:
translate english prologue_466c17b0:

    # "흘러가는 시간 속에서, 기억은 조각나 파편이 되기 마련이다. "
    "Hello? This is comment test.\nThank you!"
1. Wrap the word in a tag
First, wrap the word you want to display a tooltip for, "comment", with {cmt=(tooltip_codename)} and {/cmt}.
The tooltip codename must be a unique identifier that does not conflict with other languages or tooltips. An example is shown below:
translate english prologue_466c17b0:

    # "흘러가는 시간 속에서, 기억은 조각나 파편이 되기 마련이다. "
    "Hello? This is {cmt=english_466c17b0}comment{/cmt} test.\nThank you!"
2. Register the tooltip
In the lang_setting.rpy file mentioned earlier, create a new python block and add the source code to register the tooltip in the following format:
init python:
    TooltipComment("(tooltip_codename)", "(tooltip_content)")
Applying this, the variable would be written as follows. You can enter any non-conflicting codename for the tooltip codename.
init python:
    TooltipComment("english_466c17b0", "This is the content of the comment.")
To register multiple tooltips, you can add multiple lines within the same Python block, like so:
init python:
    TooltipComment("english_466c17b0", "This is the content of the comment.")
    TooltipComment("english_3af24308", "This is the content of the comment. (2)")
    TooltipComment("english_06bfe242", "This is the content of the comment. (3)")
    # ... (and so on)
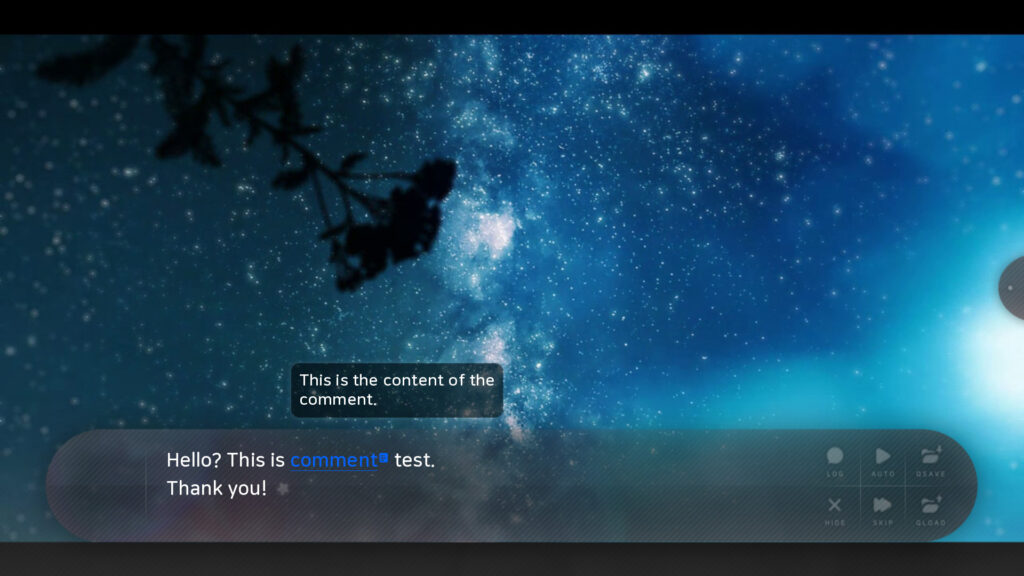
Now, when you hover your cursor over the word in the dialogue box, the tooltip will appear as shown above.
1-8-2. Font Licenses
You can add and register the copyright (license) for fonts.
Font licenses can be added as .txt files in the game/License/Fonts folder.
init -1:
    $ register_font(name="(Font Name)", font_path="(Font Path)", license_path="License/Fonts/(filename).txt")
Here is an example:
init -1:
    $ register_font(name="Roboto", font_path="tl/english/fonts/Roboto.ttf", license_path="License/Fonts/Roboto.txt")
This will add the license to the Font License screen in the 'Credits'.
1-8-3. Adding to the Credits
You can include credits for the language patch developers for each language simply by adding an image to the game/tl/(language codename)/lang_developer/ folder.
This image will be displayed when the 'Translator' tab is clicked within the 'Credits' section of the main menu.
For example, if the language codename is 'schinese' (Simplified Chinese), it will display "schinese.png" if the game language is set to Chinese. If the current language is Korean, it will display "none.png" (Korean is considered to have the language codename 'none' here). You can also include a general credits image, "others.png", to be shown for all other languages. It's best to write the content of "others.png" in English.
Of course, the language patch developer doesn't need to worry about all of this. They can just include a single credits image for the language they added. For example, if the patch is for 'schinese' (Simplified Chinese), they only need to include "schinese.png". In this case, "schinese.png" will be shown for all languages.
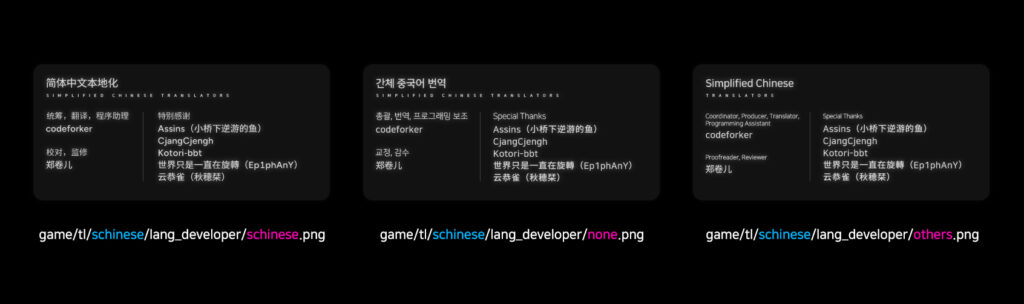
An example of a credits image translation for the language codename 'schinese' (Simplified Chinese).
Additionally, you can add your own webpage to the credits by adding source code in the following format to lang_setting.rpy:
init -4:
    $ developer_webpage['(language codename)'] = {(Homepage Icon 1): '(Webpage Link 1)', (Homepage Icon 2): '(Webpage Link 2)', ...}
The Homepage Icon is a 43x43 image. Flowers Blooming at the End of Summer provides a total of 4 templates by default:
developer_webpage_icons['x']
developer_webpage_icons['x_oldbird']
developer_webpage_icons['steam']
developer_webpage_icons['others']
Furthermore, instead of using the icon templates like developer_webpage_icons['x'], you can use a custom 43x43 image by providing its path, such as 'tl/schinese/gui/github.png', in the Homepage Icon field. Note that only the path itself (excluding 'developer_webpage_icons...') should be enclosed in single quotes.
Below is an example image and source code for adding a webpage to the 'schinese' (Simplified Chinese) translation currently included in Flowers Blooming at the End of Summer.
![]()
init -4:
    $ developer_webpage['schinese'] = {developer_webpage_icons['x']: 'https://x.com/test', developer_webpage_icons['others']: 'https://test.com/'}
You can download the credits PSD template file from the link below.
The advantage of an image file is that it can be freely modified, so please use the layout of the content (excluding the title) as a guide and feel free to customize it.
Download staff_template.psd template
1-8-4. When You Want to Add Source Code to a Language Patch
We recommend adding files with the name lang_(script_name).rpy to the game/tl/(language codename)/ folder.
When adding additional .rpy files unrelated to language translation inside the tl folder, please make sure to add the prefix "lang_" to the beginning of the filename.
1-9. 'Last Wish' Cutscene and Custom Video Subtitle System
Note: If a game/tl/(language codename)/video/lastwish.webm file (a video with pre-embedded subtitles) already exists, the 'Last Wish' fireworks cutscene will prioritize that video and will not display subtitles. To customize the subtitles for 'Last Wish', you must not include lastwish.webm in your language patch.
Starting with the 4th-anniversary update of Flowers Blooming at the End of Summer, a custom subtitle feature has been added that can be applied to video sequences and more.
With the custom subtitle feature, there is no longer a need to directly edit videos when creating a language patch (especially for the 'Last Wish' fireworks cutscene); you can now support it just by modifying the subtitles.
Since subtitles can be added indefinitely via 'lists' (see 1-9-4. Details: Adding Subtitles to a Predefined Subtitle List), this can also be used in a manner similar to tooltips that provide additional explanations for the subtitles.
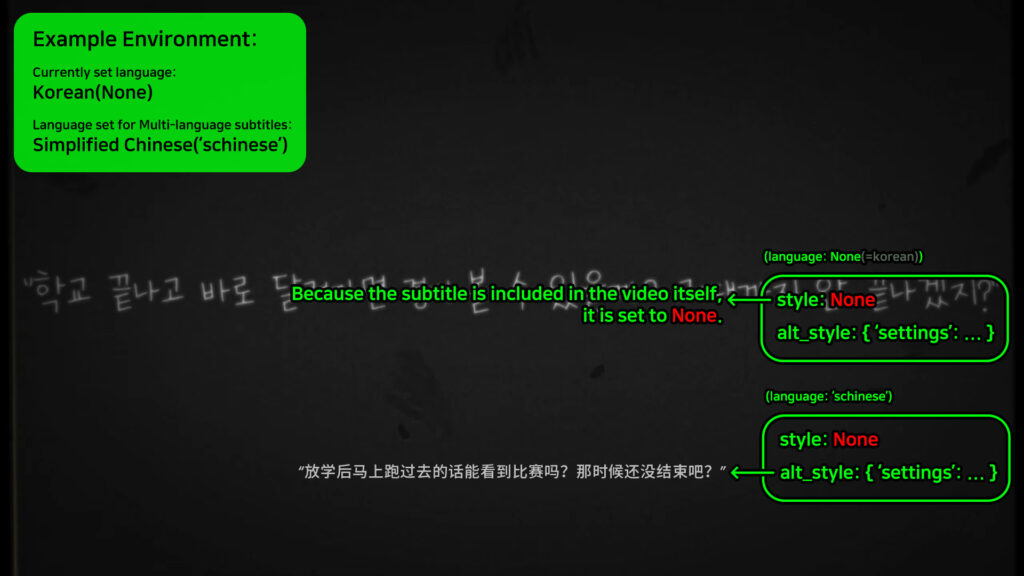
This is also useful for the Multi-Language Subtitles feature described in the Labs section below. That is, when using a video/image sequence where text is already written in a specific language (e.g., the original Korean), you can set it so that subtitles are not shown by default since the text is already present in the original language. Subtitles can then be made to appear only when multi-language subtitles are turned on and another language (e.g., Chinese, English) is selected.
When creating a language patch, you don't need to worry about these details. Just by modifying the language codename and the actual subtitle content in the template provided below, your language patch can perfectly support multi-language subtitles.
The lang_subtitle.rpy template provided below is a complete template with subtitle styles, IDs, etc., already filled in.
In this lang_subtitle.rpy template, globally replace the (language name) part with the actual language codename, modify the text following {'text': to the subtitles in the matching language, and then add it to your language patch folder like game/tl/(language codename)/lang_subtitle.rpy. This will immediately apply the translated video subtitles in scenes like the 'Last Wish' fireworks cutscene.
Download lang_subtitle.rpy template (3.0+)
The content from 1-9-1. Details: Subtitle Settings and Style Specification onwards is generally not necessary to know for simply creating a language patch, as you only need to modify the contents of lang_subtitle.rpy.
However, if you want to know how to customize subtitles in detail, please refer to the additional content below.
1-9-1. Details: Subtitle Settings and Style Specification
'settings': {
    'id': 'Subtitle ID', 'language': 'language codename',
    'style': {'pos': (Subtitle X coordinate, Subtitle Y coordinate), 'anchor': ①(X anchor, Y anchor), 'bg': ②(Background X padding, Background Y padding), 'text_style': '③Subtitle style', 'text_font': '④Subtitle font path', 'enabled': ⑤Enabled/Disabled status},
    'alt_style': {'pos': (Subtitle X coordinate, Subtitle Y coordinate), 'anchor': ①(X anchor, Y anchor), 'bg': ②(Background X padding, Background Y padding), 'text_style': '③Subtitle style', 'text_font': '④Subtitle font path', 'enabled': ⑤Enabled/Disabled status}
}
id: Enter a unique ID for the subtitle. Subtitles for different languages can share the same ID.
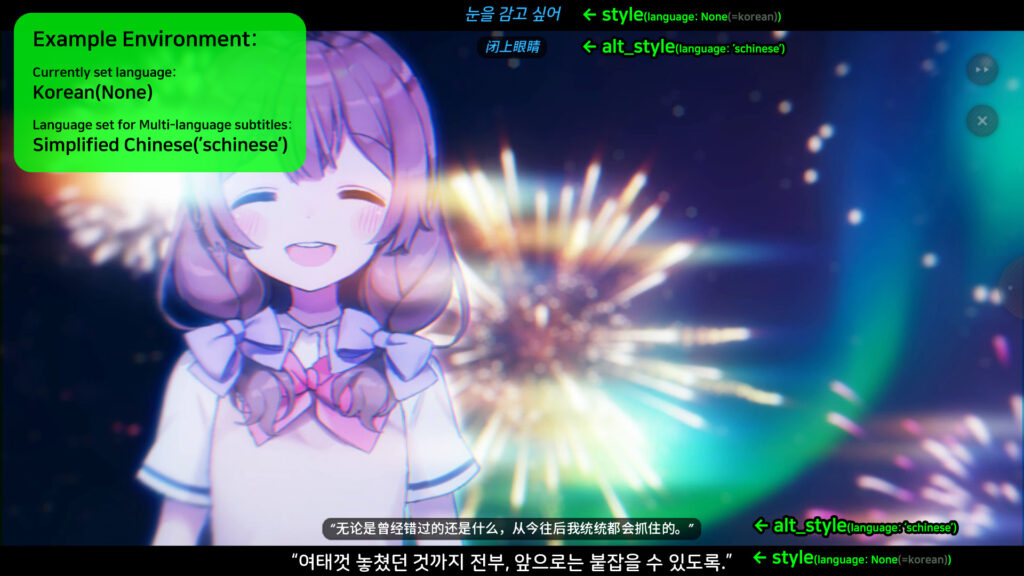
language: Enter the language codename (e.g., None, 'english', 'schinese') for which this subtitle will be displayed. None is considered the default language, Korean.
style: Defines the overall main style of the subtitle. This is the normally visible style. If you enter None for style, it is considered that no subtitle style will be used, and the subtitle will not be visible. You can set the style to None if you only want to show the alt_style (e.g., when using it as a secondary subtitle only in multi-language mode).
alt_style: This is the alternate style for the subtitle. It is used when Multi-Language Subtitles (explained below) are enabled, and this subtitle is used as a secondary subtitle for its language. If you enter None for alt_style, it is considered that no subtitle style will be used, and the subtitle will not be visible.
①(X anchor, Y anchor) specifies the anchor point of the subtitle. The range is from 0.0 to 1.0. For example, if the subtitle coordinates are (300, 300) and the value of ①(X anchor, Y anchor) is (0.0, 0.0), the subtitle will be displayed aligned to the top-left from (300, 300). However, if the value of ①(X anchor, Y anchor) is (0.5, 0.5), the subtitle will be center-aligned at (300, 300).
②(Background X padding, Background Y padding) can be used to add a black background to the subtitle. You can input X padding and Y padding, for example, as (10, 10). This will create a black background that extends 10 pixels in all four directions (top, bottom, left, right).
③Subtitle style: You can specify a Style defined through a Style statement. This Style statement can specify properties like size (subtitle size), color (subtitle color), font (subtitle font path), align (center alignment), xsize (maximum horizontal length of the subtitle). For example, if there is a Style statement like style custom_subtitles_text_style:, you can enter 'custom_subtitles_text_style'. You can refer to the provided lang_style.rpy and lang_subtitle.rpy for usage of this Style syntax.
④Subtitle font path: If a font has already been declared in the Style statement specified in ③Subtitle style, you should generally write None here to ignore it. Also, for alt_style, you can write 'language_font' to dynamically apply the font used in the default dialogue box of the specified language codename. If no font is declared in the Style statement, you can manually enter the path to a custom font within the game in quotes.
⑤Enabled/Disabled status: Enter True/False. This can be used for testing; typically, you would enter True.
1-9-2. Details: Subtitle Content and Sync Specification
'subtitles': (
    {'text': 'Subtitle Text', 'time': (Start time (sec), End time (sec)), 'fade': (Fade-in time (sec), Fade-out time (sec)), 'warper': ①('Fade-in warper', 'Fade-out warper')},
    {'text': 'Subtitle Text', 'time': (Start time (sec), End time (sec)), 'fade': (Fade-in time (sec), Fade-out time (sec)), 'warper': ①('Fade-in warper', 'Fade-out warper')}
    # Can continue adding more...
)
①('Fade-in warper', 'Fade-out warper') is the part where you specify the interpolator for how the subtitle will appear and disappear. It supports four types of warpers: 'linear', 'ease', 'easeout', 'easein'.
'linear' provides a basic fade-in/out with no interpolation. 'ease' starts slow, speeds up in the middle, and then slows down again at the end. 'easeout' starts fast and slows down towards the end. 'easein' starts slow and speeds up towards the end.
1-9-3. Details: Combining Subtitle Settings, Style, Content, and Sync
init -3:
    $ my_custom_subtitles = {
        'settings': {
            'id': 'custom_subtitles', 'language': 'english',
            'style': {'pos': (640, 7), 'anchor': (0.5, 0.5), 'bg': None, 'text_style': 'custom_subtitles_text_style', "text_font": None, 'enabled': True},
            'alt_style': {'pos': (640, 45), 'anchor': (0.5, 0.5), 'bg': (10, 5), 'text_style': 'custom_subtitles_text_alt_style', "text_font": 'language_font', 'enabled': True}
        },
        'subtitles': (
            {'text': 'Test1', 'time': (1.0, 2.0), 'fade': (0.3, 0.3), 'warper': ('linear', 'linear')},
            {'text': 'Test2', 'time': (2.0, 3.0), 'fade': (0.3, 0.3), 'warper': ('linear', 'linear')},
            {'text': 'Test3', 'time': (3.0, 4.0), 'fade': (0.3, 0.3), 'warper': ('linear', 'linear')}
        )
    }

style custom_subtitles_text_style:
    align (0.5, 0.5)
    color '#ffffff'
    font 'fonts/NanumSquareEB.ttf'
    size 20
    xsize 600

style custom_subtitles_text_alt_style:
    align (0.5, 0.5)
    color '#ffffff'
    size 15
    xsize 500
As in the subtitle example above, you must combine the 'Subtitle Settings and Style (settings: { ... })' and 'Subtitle Content and Sync (subtitles: ( ... ))' into a single variable to define the subtitle.
In the example, the subtitle is visible when the language of Flowers Blooming at the End of Summer is set to English (style). When visible, it is center-aligned at position 640, 7. Through 'custom_subtitles_text_style', the subtitle color is white, the font size is 20px, the maximum width is 600 pixels, and the 'NanumSquareEB.ttf' font is applied.
Also, when the language of Flowers Blooming at the End of Summer is set to another language, and English is set as the language to be shown in multi-language subtitles (alt_style), it is center-aligned at position 640, 45, has a background with 10 pixels of horizontal padding and 5 pixels of vertical padding, and through 'custom_subtitles_text_alt_style', the subtitle color is white, the font size is 15px, the maximum width is 500 pixels, and it uses the default dialogue font for English without specifying a separate font.
1-9-4. Details: Adding Subtitles to a Predefined Subtitle List
After creating a subtitle by defining a variable as shown above, you can add it to the predefined video custom subtitle lists below using the .append() syntax.
All predefined video custom subtitle lists are as follows:
lastwish_subtitle_list
edmovie_subtitle_list
yef1_subtitle_list
yef2_subtitle_list
yef3_subtitle_list
yef4_subtitle_list
yef5_subtitle_list
yef6_subtitle_list
yef7_subtitle_list
yef8_subtitle_list
yef9_subtitle_list
yef10_subtitle_list
yef11_subtitle_list
yef12_subtitle_list
yef13_subtitle_list
yef14_subtitle_list
yef15_subtitle_list
yef16_subtitle_list
yef17_subtitle_list
jef6_subtitle_list
typ_1_subtitle_list
typ_2_subtitle_list
yef18_subtitle_list
yef19_subtitle_list
yef20_subtitle_list
yef21_subtitle_list
yef22_subtitle_list
yef23_subtitle_list
yef24_subtitle_list
If you defined a custom subtitle with the variable name my_custom_subtitles as in 1-9-3. Details: Combining Subtitle Settings, Style, Content, and Sync, and you want to add it to the 'Last Wish' cutscene, you can add the subtitle in the following way.
There is no limit to the number of subtitles you can .append().
init -3:
    $ lastwish_subtitle_list.append(my_custom_subtitles)
If you want to add a custom subtitle list to your mod's video/image cutscenes, beyond the predefined lists in the main game, please refer to 2-2. Adding Custom Video Subtitles.
1-10. Labs Feature
Flowers Blooming at the End of Summer supports a language Labs feature. You can access it by typing "labs" into the Console or by enabling it in the language selection screen in the settings.
The language Labs feature can be used with any language patch that supports the official custom language patch functionality of Flowers Blooming at the End of Summer, and can be particularly helpful for new language learning.
However, the Labs feature is not yet perfectly complete, so there may be some shortcomings.
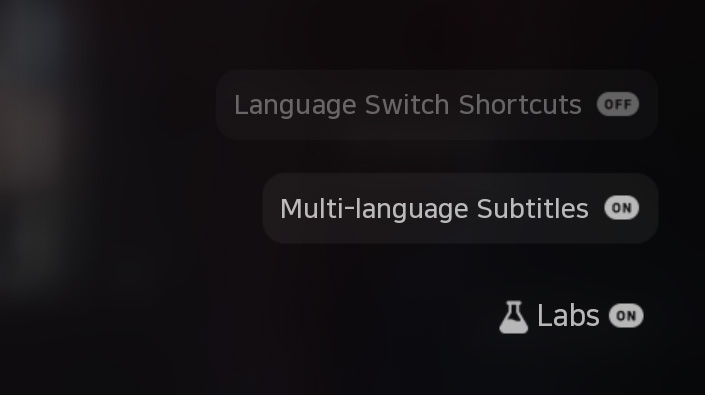
1-10-1. Language Switch Shortcuts
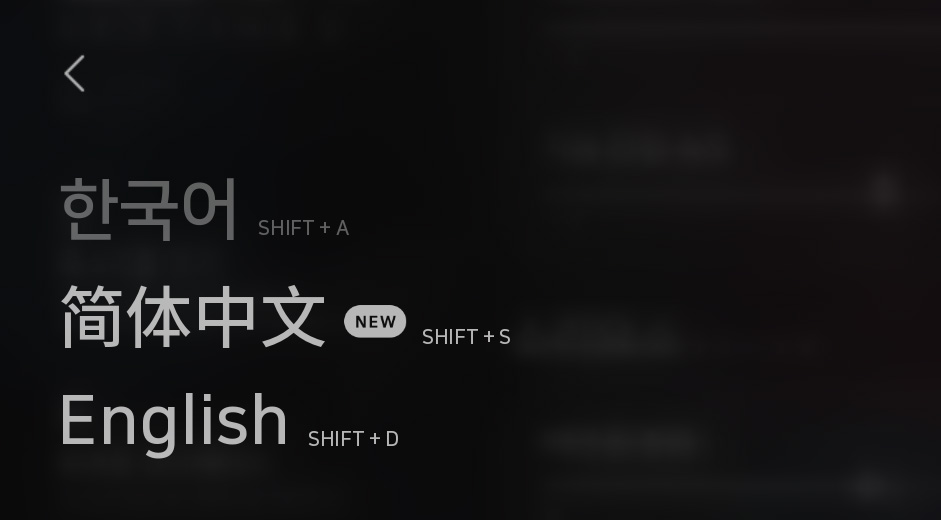
This provides shortcuts to easily change the language while progressing through the story.
Each shortcut can be found in the language switch window.
1-10-2. Multi-Language Subtitles
You can proceed through the story with additional subtitles from another language displayed simultaneously.
This feature can be helpful for language learning.
Multi-language subtitles apply to all text displayed in the basic dialogue window. To apply multi-language subtitles to videos or image effects, please refer to 1-9. 'Last Wish' Cutscene and Custom Video Subtitle System.
2. Regarding Custom Mods
Flowers Blooming at the End of Summer allows users to directly modify the work, enabling modding.
It is recommended to create a game/(mod file name)/ folder and place .rpy files with the prefix "mod_" and resource files inside it. For example, mod_screens.rpy, mod_script.rpy.
You can enter or exit a mod through the Console. You can also create custom Console commands for your mod.
The mod's .rpy file must include source code to register the mod, similar to a language. The format is as follows:
init -1:
    $ register_mod(title="Mod Title", id="①Mod Codename", mainbg_path="Main Menu Image", mainlogo_path="②Main Menu Logo Image", mainblurbg_path="Blurred main menu image used as a foreground for the menu screen", mainblurfg_path="Blurred menu screen image used as a foreground when a menu item is clicked", mainmenu_screen_name="③The menu screen to enter when the main menu is clicked", enter_cmd="Console command to enter the mod", exit_cmd="Console command to exit the mod", custom_cmds=("④Custom console command to add 1", "Custom console command to add 2..."), version="Version")
①Mod Codename: A codename to identify the mod. It should be a simple but distinct codename like "flowersblooming" or "custommod1234", and it must not change even when the mod is updated.
②Main Menu Logo Image: Also supports a full-screen 1280 x 720 image file, allowing you to freely place the logo anywhere.
③The menu screen to enter when the main menu is clicked: When the main menu screen is clicked, it enters this screen. The system default is "main_menu_menu". You can copy the contents of the original system's "main_menu_menu" screen, move it to mod_screens.rpy, rename it to something like "main_menu_menu_custom", and then use that.
④Custom console commands to add: You can create custom console commands.
If the custom console command you want to add is "custom1", you can specify the command's actions using a label like this:
label custom1:
    (content)
    return
Here is a full example referencing the system file paths of Flowers Blooming at the End of Summer:
init -1:
    $ register_mod(title="여름의 끝에 피는 꽃", id="flowersblooming", mainbg_path="gui/main/main/bg_1.png", mainlogo_path="gui/main/main/tag_1.png", mainblurbg_path="gui/blur/0/steam/main.png", mainblurfg_path="gui/blur/0/steam/menu.png", mainmenu_screen_name="main_menu_menu", enter_cmd="entermod", exit_cmd="exitmod", custom_cmds=("customcommand1", "customcommand2"), version="1.0")
2-1. Adding Custom Characters
When creating a mod for Flowers Blooming at the End of Summer, adding custom characters must follow the rules below.
If these are not followed, styles may be broken, or the dialogue transparency option added in the 4th-anniversary update (3.0) may not work.
2-1-1. Example of Adding a Custom Character Using the Default Dialogue Box
define custom_character_variable = Character(_('Custom Character Display Name'), voice_tag="custom_voice_tag", ctc="ctc_blink", ctc_position="nestled")
2-1-2. Example of Adding a Custom Character Using the Flashback Dialogue Box
define custom_character_variable_o = Character(_('Custom Character Display Name'), who_style = "dialogue_name_text_letterbox", what_style = "dialogue_text_letterbox", voice_tag="custom_character", window_background = None, ctc="ctc_blink", ctc_position="nestled")
2-1-3. Example of Adding a Custom Character Using a Fullscreen (NVL) Dialogue Box with a Shadow
define shnvl_custom_character_variable = Character(_('Custom Character Display Name'), who_color = "#ffffff00", what_style = "dialogue_nvl_text", voice_tag="custom_voice_tag", window_style = "say_nvl_window")
Additionally, you must add the following code to register that this character uses a fullscreen (NVL) dialogue box.
init:
    $ nvl_wholists.append('shnvl_custom_character_variable')
2-1-4. Example of Adding a Custom Character Using a Fully Transparent Fullscreen (NVL) Dialogue Box
define trnvl_custom_character_variable = Character(_('Custom Character Display Name'), who_color = "#ffffff00", what_style = "dialogue_nvl_text", voice_tag="custom_voice_tag", window_background = None)
Additionally, you must add the following code to register that this character uses a fullscreen (NVL) dialogue box.
init:
    $ nvl_wholists.append('trnvl_custom_character_variable')
2-2. Adding Custom Video Subtitles
You can add custom video subtitles to your mod's video/image cutscenes.
The following is an example of showing two custom subtitles, with variable names my_custom_subtitles1 and my_custom_subtitles2, in a single video.
label custom_mod_label:
    # ...

    $ custom_movie_subtitles = [my_custom_subtitles1, my_custom_subtitles2] # Defines the custom subtitle list as custom_movie_subtitles, can be added to later with .append()
    show custom_movie # Play the video
    $ show_movie_subtitle(custom_movie_subtitles) # Play the custom subtitles (custom_movie_subtitles)
    $ renpy.pause(5, hard=True) # Wait until the video stops
    hide custom_movie # Stop the video
    $ hide_movie_subtitle(custom_movie_subtitles) # Stop the custom subtitles (custom_movie_subtitles)

    # ...
For information on how to construct custom subtitles, please refer to 1-9. 'Last Wish' Cutscene and Custom Video Subtitle System and the sections from 1-9-1. Details: Subtitle Settings and Style Specification onwards.
2-2-1. show_movie_subtitle() Properties
The show_movie_subtitle() function, which plays the subtitles, accepts the following properties:
show_movie_subtitle(custom_subtitle_list, exclude=①('list', 'of', 'IDs to exclude'), offset=②(X offset, Y offset))
①('list', 'of', 'IDs to exclude'): You can enter the IDs of subtitles to exclude. This is useful for situations where certain subtitles should not be shown.
②(X offset, Y offset): Enter the X and Y coordinates to offset the subtitle display. For example, if you enter (-10, -20), a subtitle that would normally display at (300, 300) will be displayed at (290, 280).
2-2-2. hide_movie_subtitle() Properties
The hide_movie_subtitle() function, which stops the subtitles, accepts the following properties:
hide_movie_subtitle(custom_subtitle_list, exclude=('list', 'of', 'IDs to exclude'))
This function must be called when the subtitles are finished. The custom_subtitle_list and the exclude list of IDs must be identical to those passed to the corresponding show_movie_subtitle() call.